Note: I’ve included a large-scale version for some of the pictures. Just click on the caption.
On Wednesday October 18th Microsoft introduced the public preview of the Azure Information Protection scanner. I was lucky enough to participate in the private preview of this new client. And I was surprised by the speed and workings of this scanner. So what’s it all about?
AzureIP scanner
You might know Azure Information Protection as a software-client. A client used within Office or the desktop filesystem to label and protect documents. Or you might be aware of the PowerShell options of the same client; Options to scan, label and protect documents in bulk. Both options have something in common: they need some form of user interaction to be able to work.
But the Azure Information Protection (AzureIP) scanner allows you to automate the scanning, labeling and protection of your content, working as a Windows service. These services helps you protect documents stored on file shares or on SharePoint 2013/2016 (on-premise) servers.
This service can be set to run automatically or when prompted. And one of the best features: it keeps the metadata of the content intact. Which is very cool. When run, the service creates multiple logfiles, of which this is a summary.

How does it work?
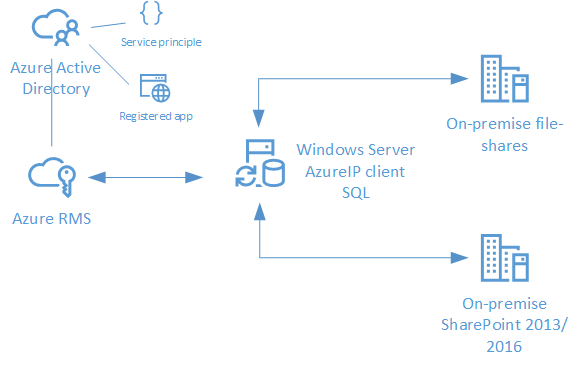
In basis, the solution is very simple. The AzureIP scanner service runs on a platform (preferably a Windows Server) and uses the AzureIP client and AzureIP service in non-interactive mode.

The scanner accesses file shares and/or on-premise SharePoint 2013/2016 environments to classify and protect content. You can use PowerShell cmdlets (see below) to change the behavior of the scanner.

How to start?
You will need a platform to run the scanner, accounts which can access the environments and access to the RMS policies. You also need the AzureIP environment to run in non-interactive mode. Which requires a service principle in Azure AD.
All these steps and the prerequisites are well documented by Microsoft. Just go to: https://docs.microsoft.com/en-us/information-protection/deploy-use/deploy-aip-scanner
Here’s some of the steps I took to get the scanner running.
Service principal
The AzureIP scanner will need to connect to the Azure Rights Management service. Because it is a service itself, the scanner will connect non-interactively with Azure RMS. To ensure that you can connect non-interactively, you need to use a so-called service principal. To create one, you need the New-MsolServicePrincipal cmdlet to create a new service principal.

Connecting to non-interactive RMS
In order to have the RMS service to rung in non-interactive mode (which will be used by the scanner), you will need to run this cmdlet: Set-RMSServerAuthentication -Key -AppPrincipalId -BposTenantId
Configure Azure Information Protection
The scanner requires Azure AD app registrations to function. You will need to run this AzureIP cmdlet in order for the scanner to use these apps: Set-AzureIPAuthentication -WebAppId -webAppKey -NativeAppId

Installing and configuring the scanner client
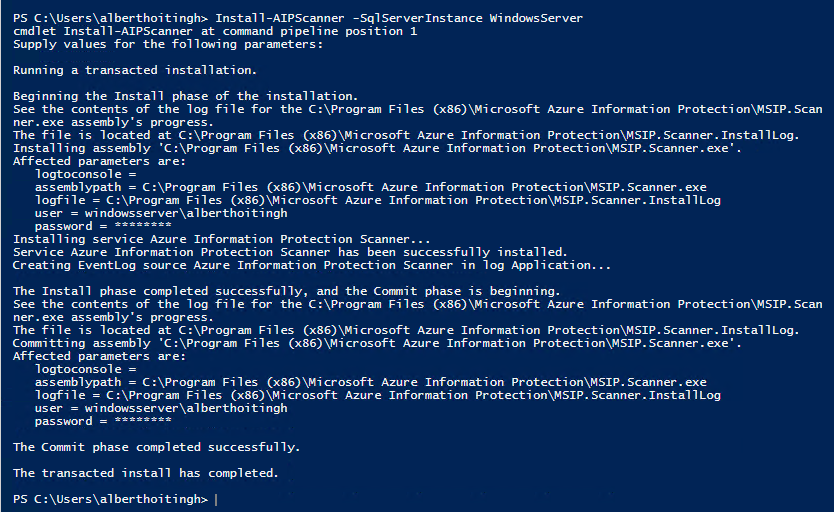
After these steps, you’re ready to install and configure the AzureIP scanner client. This installation will create a SQL database on the database instance that you’ve installed. Installing the scanner requires this cmdlet: Install-AzureIPScanner -SqlServerInstance

Running the scanner
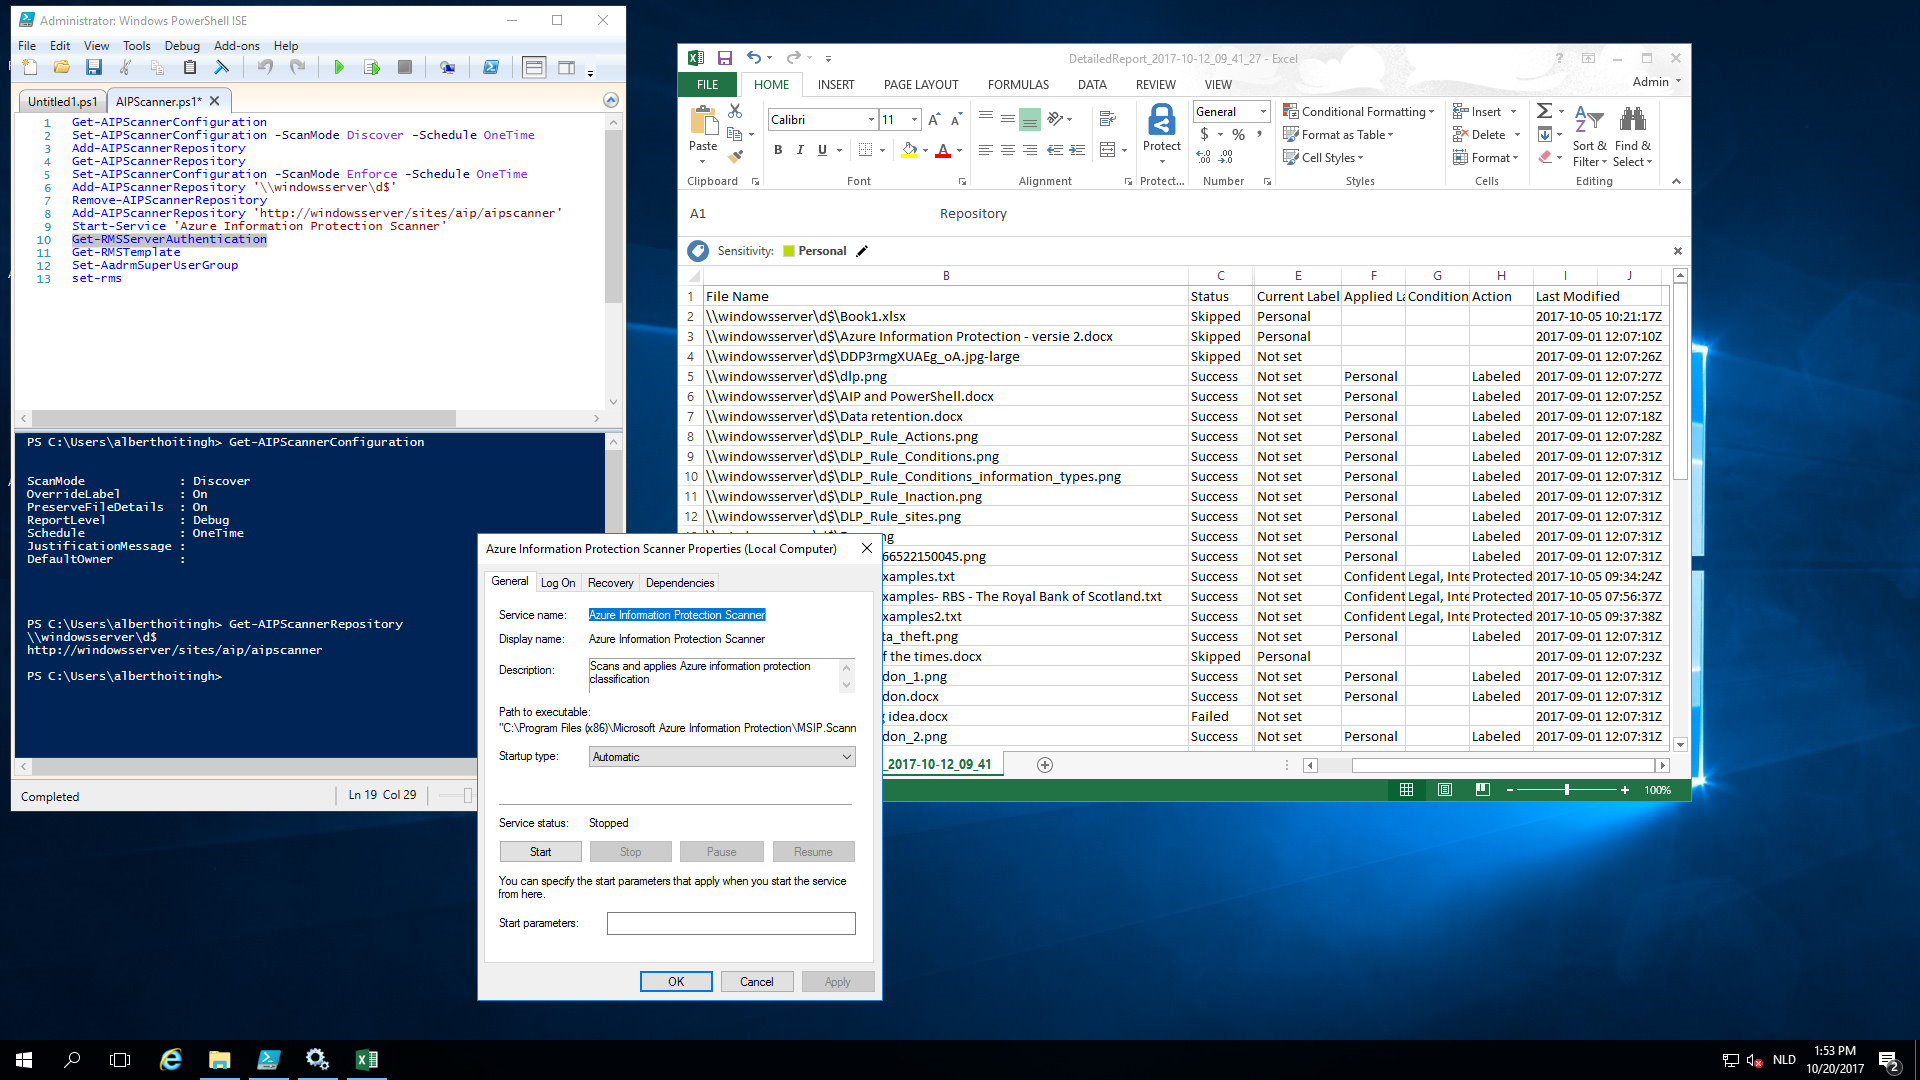
The scanner is configured using PowerShell. You can add locations to scan and you can configure the steps the scanner will take when it’s being run. For example, this cmdlet will provide you with the scanner’s configuration:

The cmdlet Add-AzureIPScannerRepository will allow you to add scan-locations (\\server\fileshare or <url_to_the_sharepointsite/documentlibrary>.

The Set-AzureIPScannerConfiguration allows you to control the workings of the scanner. Let’s say you want the AzureIP scanner to scan a file-share once, but not to apply a label or protection. Here’s the cmdlet to use:
Set-AzureIPScannerConfiguration -ScanMode Discover -Schedule OneTime
Note: the -Schedule option is tricky. If set to OneTime, the service will stop after having run. If set to continuous, it will run forever.
Here’s a list of all cmdlets.
| -ScanMode | {Enforce | Discover} | Set to Discover to instruct AzureIP scanner to scan the repositories in “whatif” mode. In this mode scanner inspects the files and creates a report for discovered files without changing the files (no labeling or protection is applied)
Set to Enforce to instruct scanner to scan the repositories and apply AzureIP policy. In this mode scanner inspects the files, classifies them and applies labels and protection according to the defined AzureIP policy. |
| -Schedule | {OneTime | Continuous | Never} | Set to OneTime for single scan. In this case AzureIP scanner scans the defined repositories one time and then the service is stopped.
Set to Continuous for continuous scan. In this case scanner service runs always and once the scan cycle passed through all files in the defined repositories the scanner starts the new scan cycle on same repositories. |
| -OverrideLabel | {Off | AppliedByScanner | On} | Defines if the scanner reapplies the label and its action on already labeled files. By default, scanner reclassifies only files that were classified by scanner itself. If you want scanner to reclassify files previously classified by another account set this parameter to On. |
| -JustificationMessage | Free text | This setting is required in case you want AzureIP scanner to be able to lower sensitivity level and your policy requires justification for this action. |
| -ReportLevel | {Off | Debug | Info | Error} | Defines the level of logging for detailed report.
Debug – includes the skipped items, useful for troubleshooting, but has performance impact on scanner. Info – only files with applied action. Error – errors only. Off – disables reporting, best for performance. |
| -PreserveFileDetails | {On | Off} | Set to On in order to preserve file attributes, like archive flag, Date Modified and Owner for the labeled and protected files. Set to Off if you want to reflect the change of the file in the attributes listed above. |
| -DefaultOwner | For SP files scanner uses SP author property to set RMS owner of the file. For files without author or for files stored on other repositories (shares or local) scanner sets its own account as an owner.
If you want scanner to set another owner for files without author field or for scanned files via CIFS or local files set desired owner’s email in this parameter. |
In action
When you have set the locations to be scanned and the action to be taken, you can finanly start the scanner service. When running, this service will creating logging, which can be found at
%localappdata%\Microsoft\MSIP\scanner\Reports
It stores up to 60 last scanning cycle reports. All except the latest report are compressed. For example:

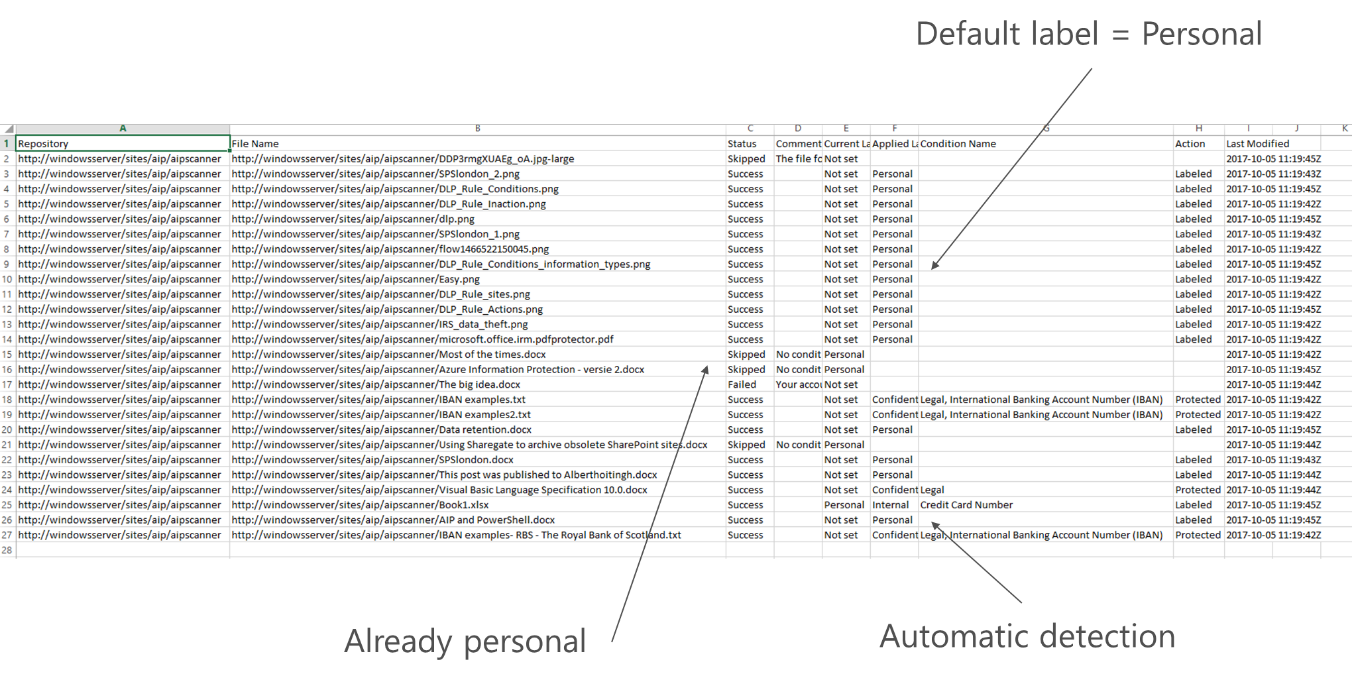
I’ve tested the scanner with file shares and SharePoint document libraries. The content in these locations were scanned, labeled and protected in seconds and provided me with this logfile.

In my AzureIP policy I’ve made the label “Personal” mandatory. As a result, you can see that most content has been labeled with Personal. However, some files contained sensitive content. And these were labelled and protected by the scanner. Very nice! The files are stored in a SharePoint 2016 document library, but none of the metadata was changed by the scanner.
Some thoughts on this preview
Take a close look at this scanner. It provides us with the options to scan, label and protect content within your on-premises enterprise. It can also run autonomously.
If you don’t want to label or protect your content, you can use the scanner to just “scan” (parts of) your on-premise environment for sensitive content. The outcome of which might just surprise you.
The scanner only works for on-premise content. If you want to look more closely at content stored in “the cloud”, you might want to consider Microsoft Cloud App Security (MCAS).
I would like to see a specific Azure admin-portal blade/dashboard for the scanner and logfiles of the AzureIP clients working in the enterprise. Something for the roadmap?
5 comments