For those of us working with Microsoft 365 the sensitivity of information is mostly related to unstructured information: documents and e-mails. But we should not forget that there are lakes of data (pun intended) out there which also contain sensitive information.
Information might be stored in SQL servers, Cosmos db’s, Amazon AWS S3 buckets and more. With the announcement of Azure Purview, Microsoft now extends the information classification and labeling functions to these environments. As this is still in (public) preview, I decided to check this out. Here are my experiences. If you want to know more about Purview, then visit Azure Purview for Unified Data Governance | Microsoft Azure.
Let’s start with Purview itself. When we go to https://web.purview.azure.com and login (provided that you’ve activated the platform and created an admin-account), you will be directed to the landing page. From here we can configure data sources, configure scans of these sources and get an insight into the results. Quick tip: you can use the search bar to really get to your results quickly. For example; If you need to get the results for all credit card information, then just type in “Credit card”….

Azure Purview allows you to create an overview of your Azure (and others?) cloud storage location for either documents (blob for example) and structured data (like SQL). You can organize your dashboard in collections and sub-collections. In my example, I’ve created a collection, sub-collection and the sample data sources.

In order to test out this new platform, I decided to use two different Azure storage options. The first was a simple storage account with an Azure blob. I randomly added several files to this location – Office, PDF, images, and so on. The second was an Azure SQL database. I used a sample database for this, just to see how I could connect Azure Purview to this. The database contains information on sales: customers, products and the like. One really nice feature in Purview, you can browse your data sources.

Please note that in order for Purview to access this data, the account (service principle, managed account), needs to have sufficient access. Makes sense.
Scanning sources
To scan a source, you will need to register this. The proces is easy and straight forward. You can select your source from several out of the box options provided. Next, you will need to configure the account used by Purview to access the data source. If needed, you can test the connection before you continue.
When you continue, you are presented with the content of the source and you can adjust your scope if needed. Next is the scan rule set. There are many out of the box configurations, but you can add your own – if needed. A rule set basically defines what to scan and what to look for. If you want specific filetypes to be scanned or scan specific classification types, then this is the way to do that. After this, you can set the scan to be manual or recurring. After this, the scan will start.


Classification and labeling
Classification of data is one of the core functions of Purview and the platform offers this by ways of sensitive information types or custom types. These sensitive information types are (mostly) the same as the ones we know from Microsoft 365. But Purview has additional types as-well like the EU Phone Number, World Cities and Person’s name. And you can create new classifications and classification rules (based on regex or custom expressions). But I’ll skip these for now. During a scan of the content-sources, the sensitivity is detected.

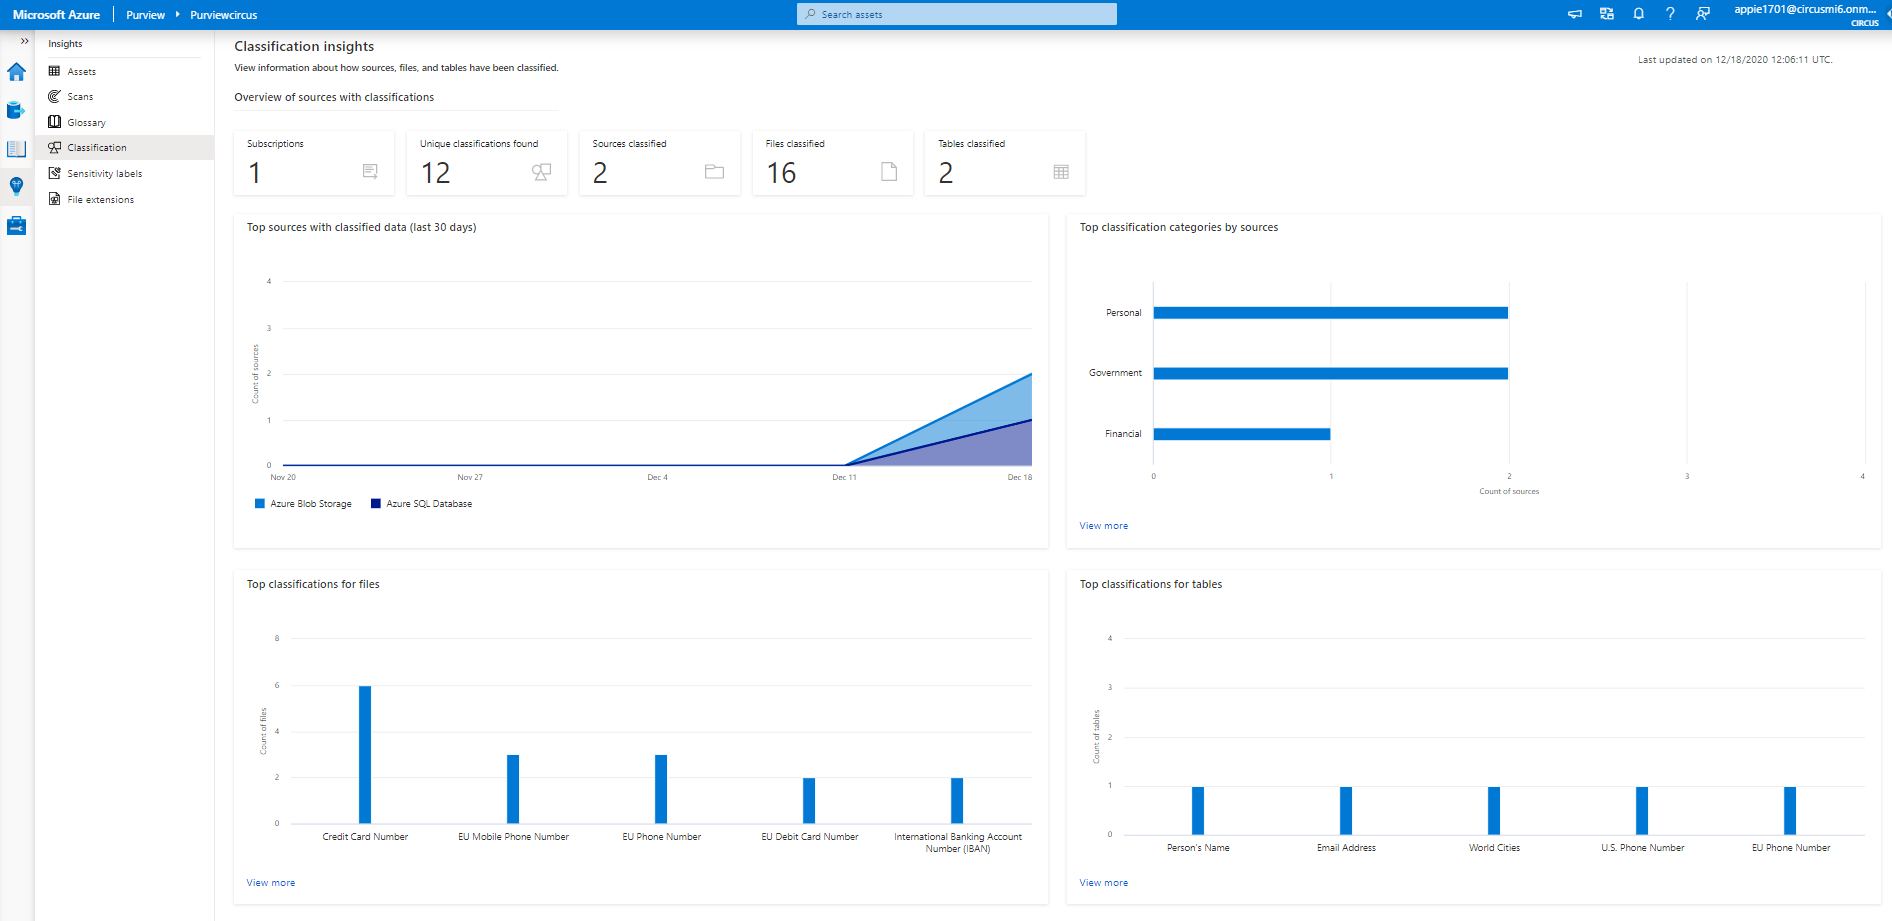
The Insights overview presents the data from your data sources. Here you will find your sources (Assets), an overview of your (running) scan, the glossary (I’ll skip this for now) and the results of the scans: classification information, sensitivity labels and file extensions.
If you go for the classifications, then you will be presented with a nice dashboard of all results. Let’s say you want to look at the classifications for files, then you select View more, select the classification(s) and select Browse assets. You will end up in the search and results section. The classification (and more – labels) are presented as refiners. Just select a document to get the details (location, metadata and more).


As is clear from these screenshots, you can also use labels to protect your documents and other assets. For this, Purview connects to Microsoft Information Protection. You can now use sensitivity labels to be either used on documents in Azure storage or columns in databases. This is really cool stuff! These labels are still created/modified in the compliance center.
Configure sensitivity labels
The Unified Labeling environment of Microsoft 365 is directly linked to Azure Purview. This goes two ways. From Purview you can select insights into the sensitivity labels that have been applied to data. And from the Microsoft 365 end, you can create labels to include Purview assets.
In order to do the latter, you first will need to extend your Microsoft 365 environment to Azure Purview. This way, the information from Microsoft 365 is exchanged with Purview. And, you’ll be able to use your labels for either documents or data stored in Azure.

Next, you will need to configure the label. The standard components of the sensitivity label have been augmented with several options. First is the scope. You can now select the Azure Purview assets (preview). This scope is used the label documents and SQL columns. But beware: in order to use this on documents, you will also need to set the scope to Files& emails and define auto-labeling rules for the label! Important this one.


When labeling database assets, you can use the build-in sensitive information types to determine what needs to be detected. The scan in Purview will determine the labels based on the auto-labeling rule you set-up.
After some time, the scan will present you with the results. And as you can see in the screenshot, many sensitive information has been detected in my blob storage. When the classification is detected based on the sensitivity label, this is also displayed in the example below.


But where are the labels?
Ahum…. Yep. That’s a good question. One thing I did notice was that at one point my documents were labeled, and then the classification was gone. This is weird behavior. But after creating some new labels and publishing them, the information was presented as planned. One of these labels was called Purview_3 (I’m kinda lasy that way), and this one was linked to credit card information.


The weird thing – I did not see any data on the sensitivity labels dashboard. I do hope that in part 2 of this blog I will be able to show you more.
If you need to, you can access some nice support material from the Azure Purview page. This includes a nice “troubleshooting” guide. Nice to notice, some of these support pages still reference the name “Babylon”, which was the codename for Azure Purview 🙂

Video
In this video you’ll see Azure Purview in action. I hope you enjoy this. As this video was recorded earlier, I wasn’t able to fit in the labeling dashboard. So I added a small addendum 🙂
Stay tuned for part 2 of this blog.
2 comments