This week has seen a tidal wave of Microsoft information on the new General Data Protection Regulation or GDPR. I was pleasantly surprised by this. So this article is about on of the new Office 365 functions regarding GDPR.
In this article I describe these new (or improved) functions. If you’re only interested in my conclusions, see the end of the article. 🙂
GDPR and Microsoft
Let’s be fair. Microsoft has informed us from the start about their platforms and the new EU regulation. In this article: General Data Protection Regulation (yep: another one) I already mentioned a lot of that material. And at the end of 2017 this document was published and the Office 365 Compliance Manager became available.
As great as all these materials are (and they are great), sometimes your wondered what to do with them. It was like completing the puzzle, with the pieces supplied by Microsoft. And you can, don’t get me wrong. When configured correctly, using functionality like (advanced) data governance labels, eDiscovery, data loss prevention, you configure your Office 365 environment to be “GDPR-ready”.
But, again, I was very pleasantly surprised this week. Microsoft announced and implemented new functions to support the process of data subject requests. Another piece of the puzzle, but now the puzzle’s been nearly completed for you.
So in this blog, I’ll be looking at DSR from the new Office 365 function. More information on this (and more) function(s) is available at the Microsoft site:
- https://docs.microsoft.com/en-us/microsoft-365/compliance/gdpr-data-subject-requests
- https://docs.microsoft.com/en-us/microsoft-365/compliance/gdpr-dsr-office36
Data Subject Request (DSR)
What is a DSR? A DSR is a data subject request. As you are aware, any EU resident can request an overview of his/her data being processed and stored within an enterprise. The enterprise is obligated to provide this overview and the data itself (an export, for example).
Do not mistake this for the well-known “right to be forgotten“. This right allows an EU resident to request removal of their data. This blog is not about that article in the GDPR.
By the way. This blog is about Office 365 and DSR. But Microsoft has an extensive range of material covering other platforms as-well. I was very impressed by the Azure DSR solution. You can find more information on this here: https://servicetrust.microsoft.com/ViewPage/GDPRDSR
Office 365 DSR
Before the new functionality, you had several pieces of the compliance-puzzle to use. There was eDiscovery case-management, content search and perhaps data governance labels. Putting these pieces together you could search for content (and place it on-hold) and export it.
Not surprisingly, Microsoft has used these functions and rolled them into one, clear, solution. And you can find this solution from the Office 365 security & compliance center.

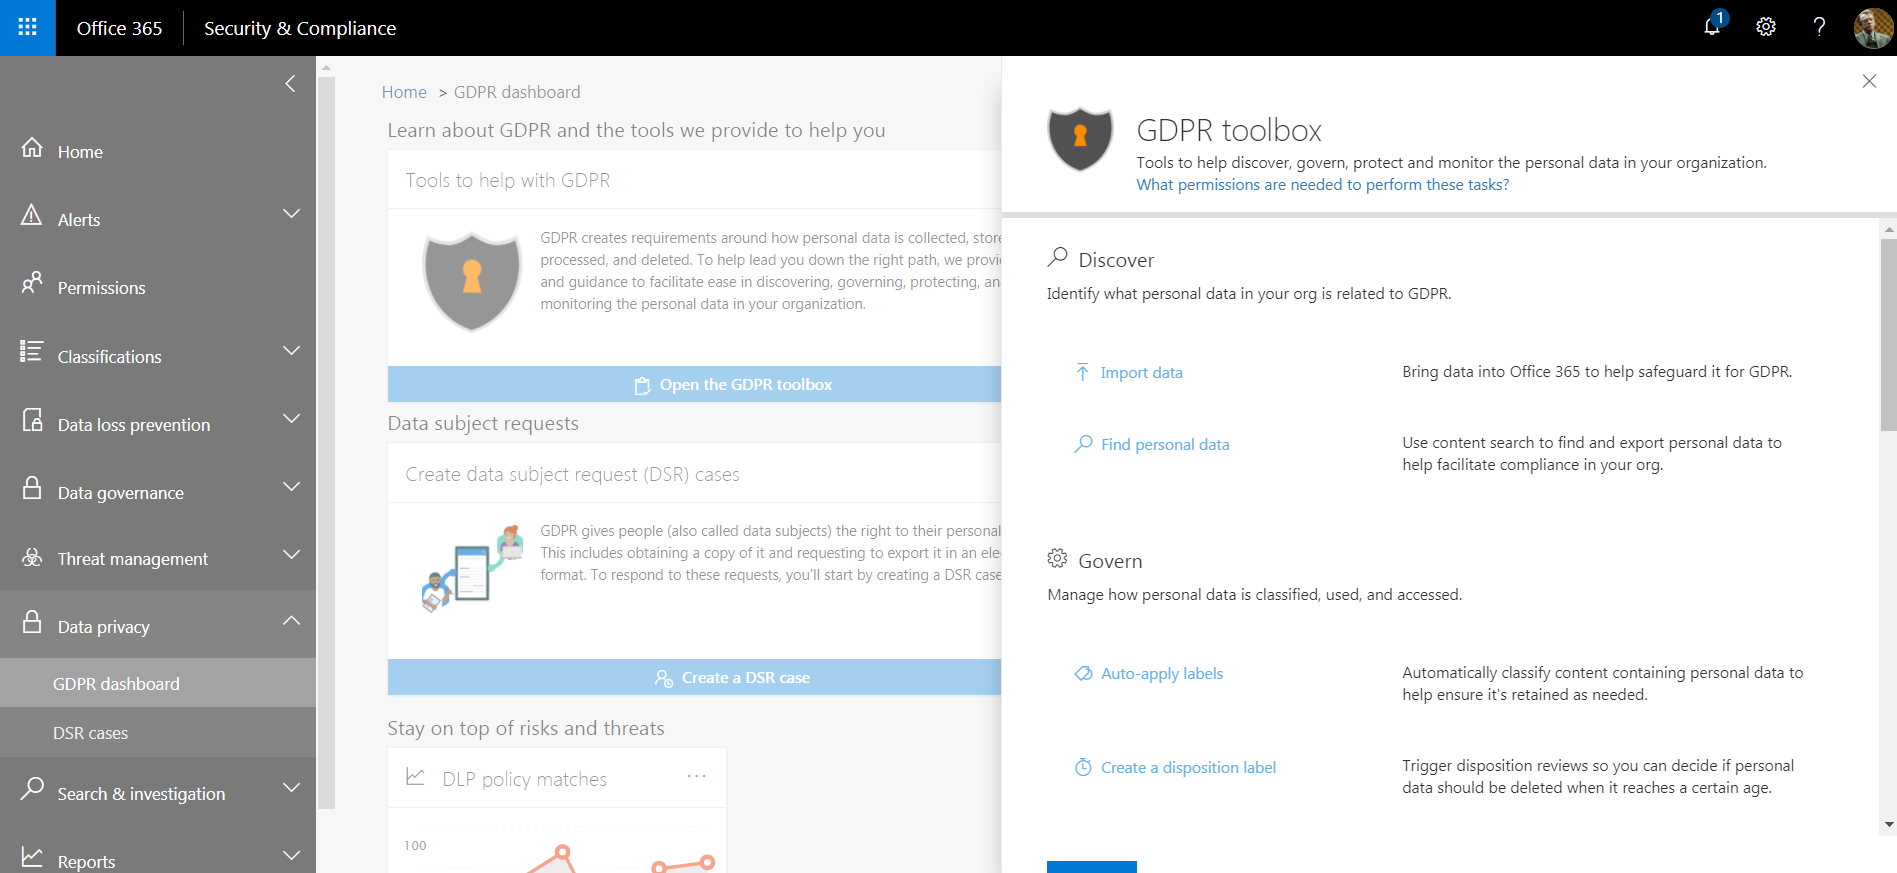
The data privacy section is new. It provides us with a GDPR dashboard and the DSR section.

The GDPR toolbox provides us with links to other sections in the security & compliance environment. For instance, data governance labels. But I’m interested in the DSR case-management solution. So I’m opening the “DSR cases” dashboard.
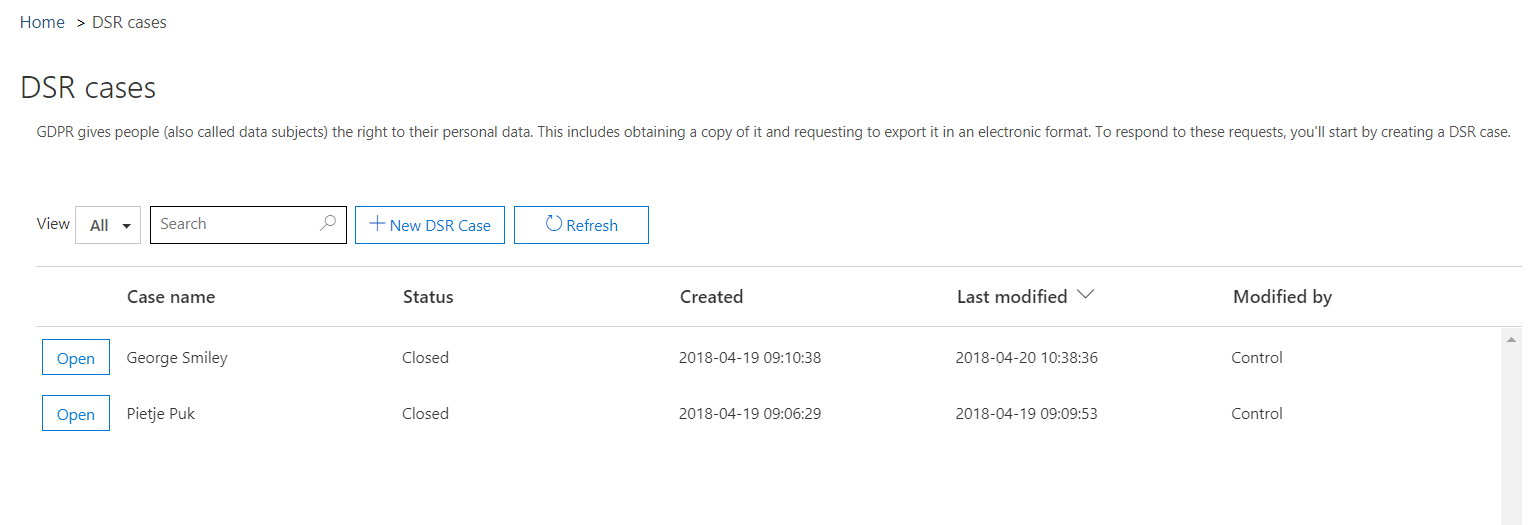
DSR cases
The DSR cases dashboard gives you an overview of all the cases, either still open or closed. I’m not sure how long these closed cases will be stored or archived, but I would like to know 🙂

From the dashboard, let’s start a new DSR case. You will need to provide a case name. As these are unique, make sure to add some distinguishing information. In other words, you cannot have multiple cases with the same name.

Now that’s done, let’s look at the details. One thing you will notice, is that you will need an e-mail (SMTP) address as the requestor. You can select one from the Azure AD, or input another address.

Now you can confirm your settings. Please be careful, you cannot edit this case metadata after it has been created.

Content search
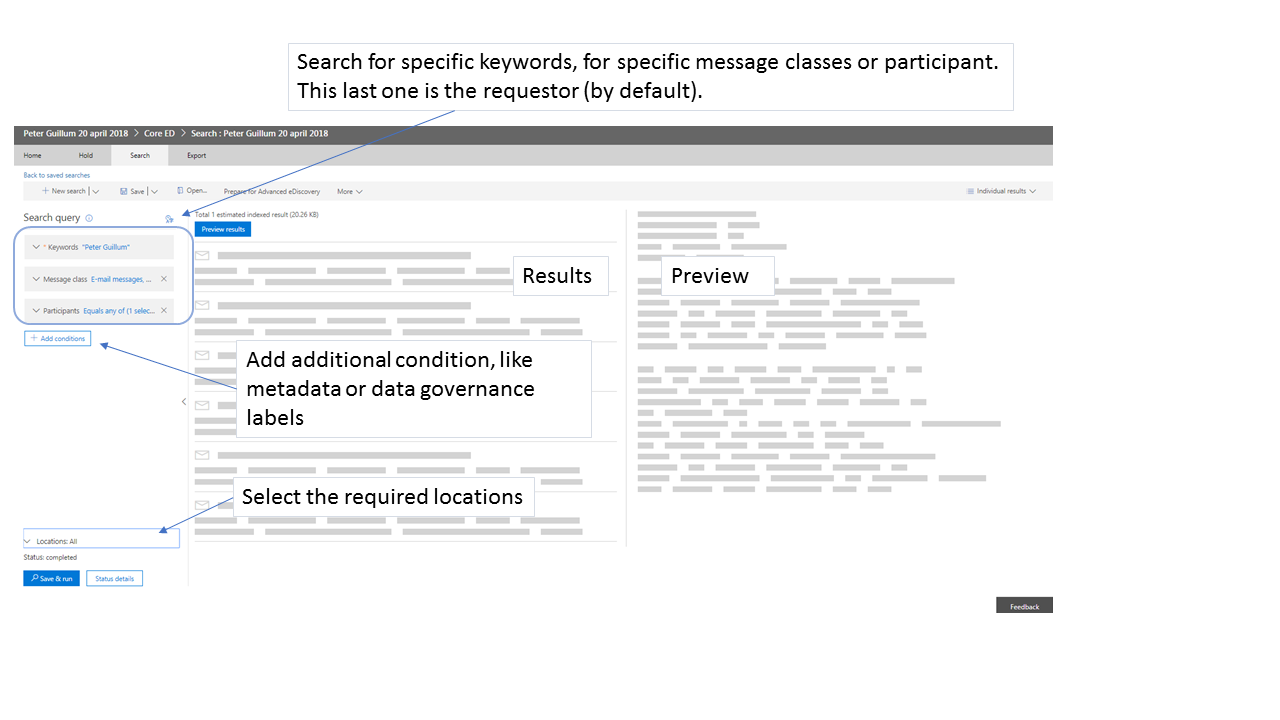
Ok. Now it gets a bit complicated. When a DSR case is created, it will create a search query based on the e-mail address you specified. And it will use the default settings to do the search. But….. you can edit this search query and add more search queries if needed. Let’s look at the default first.

This search-query screen is made-up of many components. Most prominent is the preview-section. This section is by default open. But you can choose to have the previews shown manually. Which might be very nice, from a privacy perspective.

Let’s look at some of the sections.
Keywords
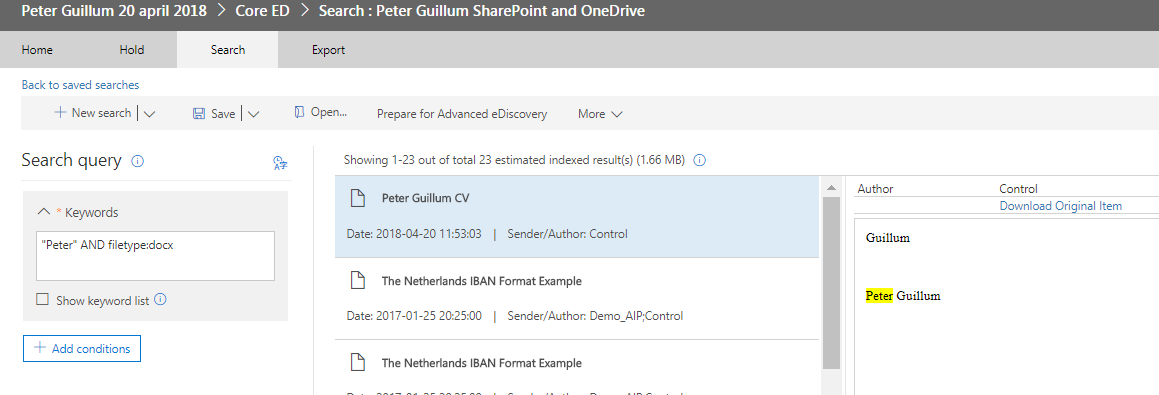
You can use this to do a free-format search on the keywords you provide. For example, if you want to search for a name, enter the name in ” “. You can also use operators like – for example “Peter Guillum” AND Filetype:docx.
A nice example of this is below. And notice the yellow marking, showing where the search-result is found.

Message class
This is used to search for specific classes. The list is very comprehensive. To say the least…..

Participants

By default, this section is filled with the requestor’s e-mail address. But you can add more.
Be careful! This section is only used to search in Exchange or Exchange related functions (Office 365 Groups, Microsoft Teams, etc.). It will not be used in SharePoint or OneDrive. When you want to search in these locations as-well, you will need to add more conditions to have valid results returned. When I was testing this, I got all my SharePoint content returned to me, when I was only using this section.
Conditions
You can use this section to specify conditions like the Author of a document or the date is was created.

Locations
In this section you will configure the location which will be searched. Be careful with this! As Exchange and SharePoint are used by other Office 365 platforms (Teams for example), you will need to look carefully at the options presented.

One search query
You might be taken aback when looking at these options. And to be honest, it will take some time to create the perfect query to get all the information out. You do need to realise that all these sections combined form the search query.
Which sometimes will work perfectly, but sometimes you will not get any results – as they might conflict which each-other. My recommendation: create multiple search queries. For example:
- One search query for any e-mail related results;
- One search query for all information in the personal OneDrive.
- One search query for all other content.
And you know what? That’s possible. You can create multiple search queries related to one DSR case.
Multiple search queries
To create an additional query, you simply select the option New search. The options are relatively easy. I would recommend starting from the guided search.

Now you can create a different search query. Don’t forget to save this! Now that we have multiple queries, we can easily use them. We can combine the queries to export the results or the search report.
Exporting results
As our requestor is entitled to have the content delivered to him/her, we will need to export it. For this we need to go to the Search tab. Don’t go to the Export tab yet. That one is used to access recent exports.

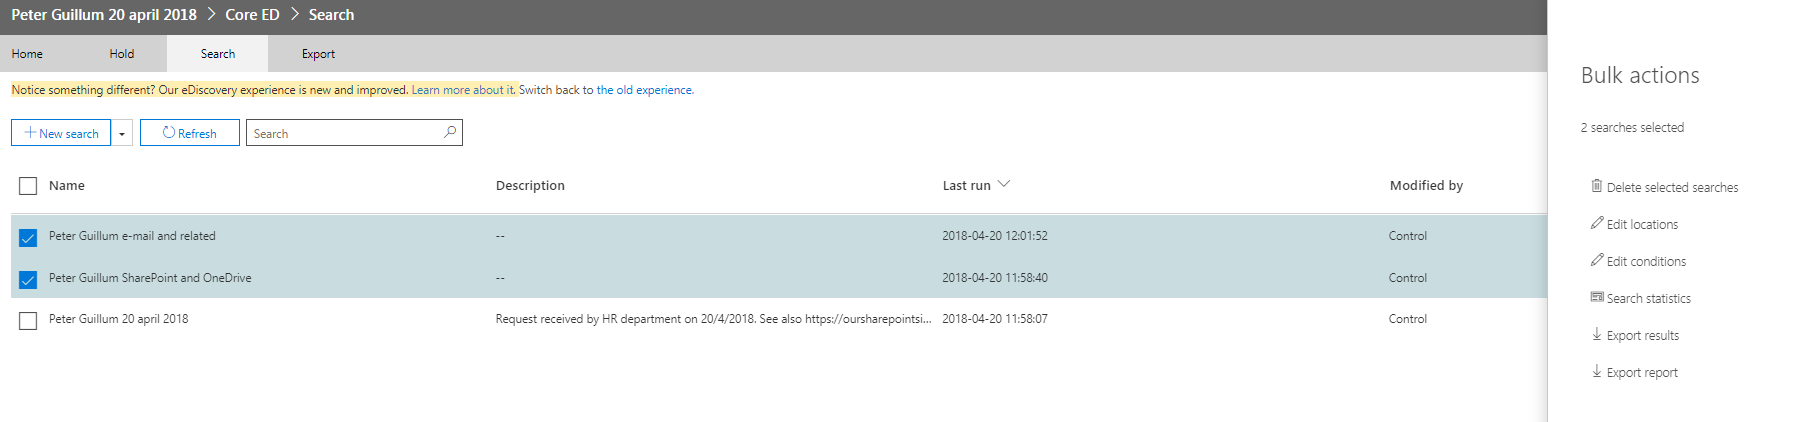
Here you select the search queries you want to combine and select export results or export report. In the example below, I’ve chosen to export all e-mail related content for Peter.

Please note that this Export button only starts the export. To get to the result, you will:
- Switch to Internet Explorer or Edge (yes!);
- Go to the Export tab.

Here your select the saved export and go to Download results. Please note the download key! You need this in the next steps. The download requires a separate client to be installed. After that’s done, you paste the key. And the download will start.

In this example, I just exported the results from e-mail and related content. So my export-file contains a PST-file with the e-mails and additional (meta)data files. Nice, huh!

Conclusions – if any
It’s very nice to see that Microsoft is taking the effort to help enterprises become GDPR-ready. Most of the options as described in this article are not new. But these were hard to find or somewhat hard to understand. By creating a GDPR and DSR dashboard, this will become more easy. But make no mistake, eDiscovery/content search/compliance is not something to be treated lightly!
I do have some remarks/questions:
- The solution does not support workflows. A DSR is one of the prime examples of a process which can be “workflowed”. Perhaps Flow can help here?
- There is nog “Back” button from the case section. You need to go back to the security & compliance section, or use the “Back” button in the browser.
- You can only export using a tool which relies on Internet Explorer or Edge. Really???
- You cannot remove cases, only close and re-open them;
- The “participants” section might be misunderstood – as this only works in e-mail related content.
But to be fair: it is great to see this kind of functionality!
One comment