In this blog I want to focus on Exchange Online, Office 365 Message Encryption and Azure Information Protection. Working on their own or together, these platforms offer lots of solutions to protect sensitive information.
To be honest, the information in this blog isn’t new. But I found this very interesting, so I decided to share it anyway. Let’s look at three scenario’s:
- Scenario 1 : Apply Do Not Forward protection based on subject.
- Scenario 2: Apply Do not Forward protection based on sensitive information.
- Scenario 3: Block e-mails with a specific Azure Information Protection label.
Scenario’s 1 and 2: Do not forward
There might be situations where you need to protect any outgoing communications from a group of employees. Let’s just say that any e-mail send from the HR department, with the subject “media campaign” to people outside of your organization, must never be forwarded.
The “Do not forward” option is standard with Office 365 Message Encryption. It ensures that only the recipients of the e-mail can open it and that it cannot be forwarded (duh…). In addition, the content of the e-mail cannot be edited or printed. A very low-level, but high impact measure.
But it’s an option that needs to be set manually by the user. By using Exchange Online mail rules, we can set this option automatically based on the specific criteria. In our first scenario the criteria included senders from the HR department (or HR media group), and the subject could contain “mediacampaign” or “media campaign”.
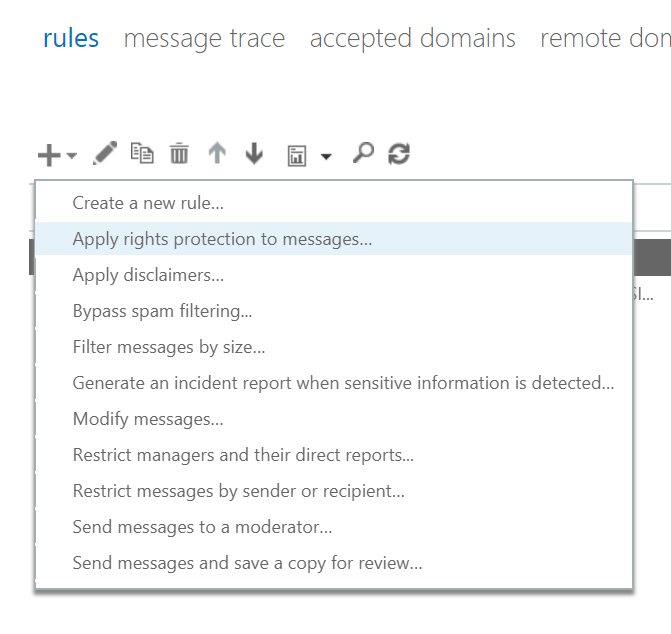
Setting the option is easy. Go to the Exchange Online admin-center and select Mail rules | Apply rights protection to messages option.

The rules will include the criteria named above (in my scenario I have an Active Directory group named HR Media). Remember to add the condition that the recipient is located outside of the organisation.
At the Do the following section, I will select the Apply Office Message Encryption and ….. option and from this the Do Not Forward action. That’s it.

Kind of easy, isn’t it? And very powerful. You can use this, for example, by protecting all outgoing e-mail from the management team. Or from your tender desk. There are a lot of scenario’s. You can even differentiate between all people outside of the organisation and partners.
Scenario 2
This scenario is somewhat similar to the first. But in this scenario we want to add the “do not forward” to all outgoing emails from our boss (George) which contain sensitive content. We have a custom sensitive type (Employee ID) for this. This kind of e-mail should not be forwarded. Again, the configuration is easy.

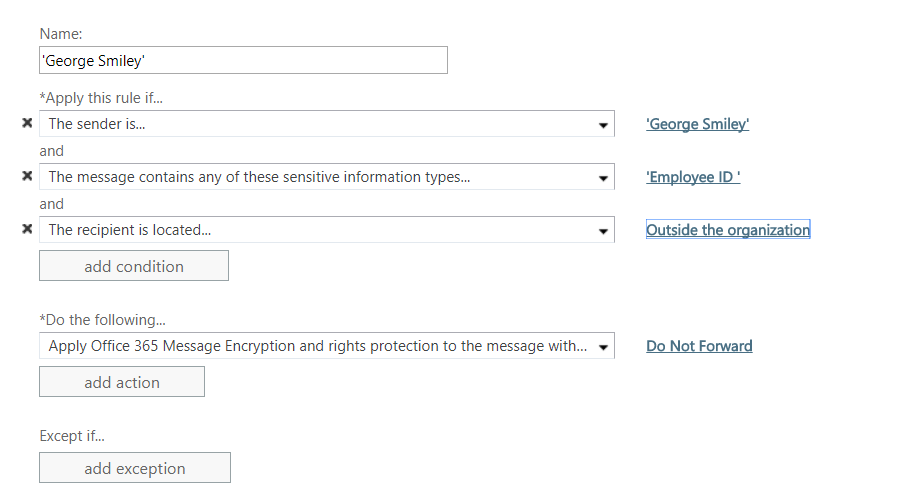
Just to reiterate: the Employee ID sensitive information type is a custom one. I created this to scan for any employee-id related content. I would write a blog about this, but here’s an excellent one from Microsoft: https://support.office.com/en-us/article/create-a-custom-sensitive-information-type-82c382a5-b6db-44fd-995d-b333b3c7fc30
Scenario 3
Let’s assume that the organisation is using Azure Information Protection to classify and protect information. Any e-mail labeled GDPR – PII\IBAN cannot leave the organisation and needs to be blocked. For the sake of clarity: that’s the e-mail message being labeled, not the attachments.
The last remark is very important and we have to know a little about Azure Information Protection for this. As part of the labeling and protection function, AzureIP adds information to the header of the e-mail.
The same goes for any other content, by the way.
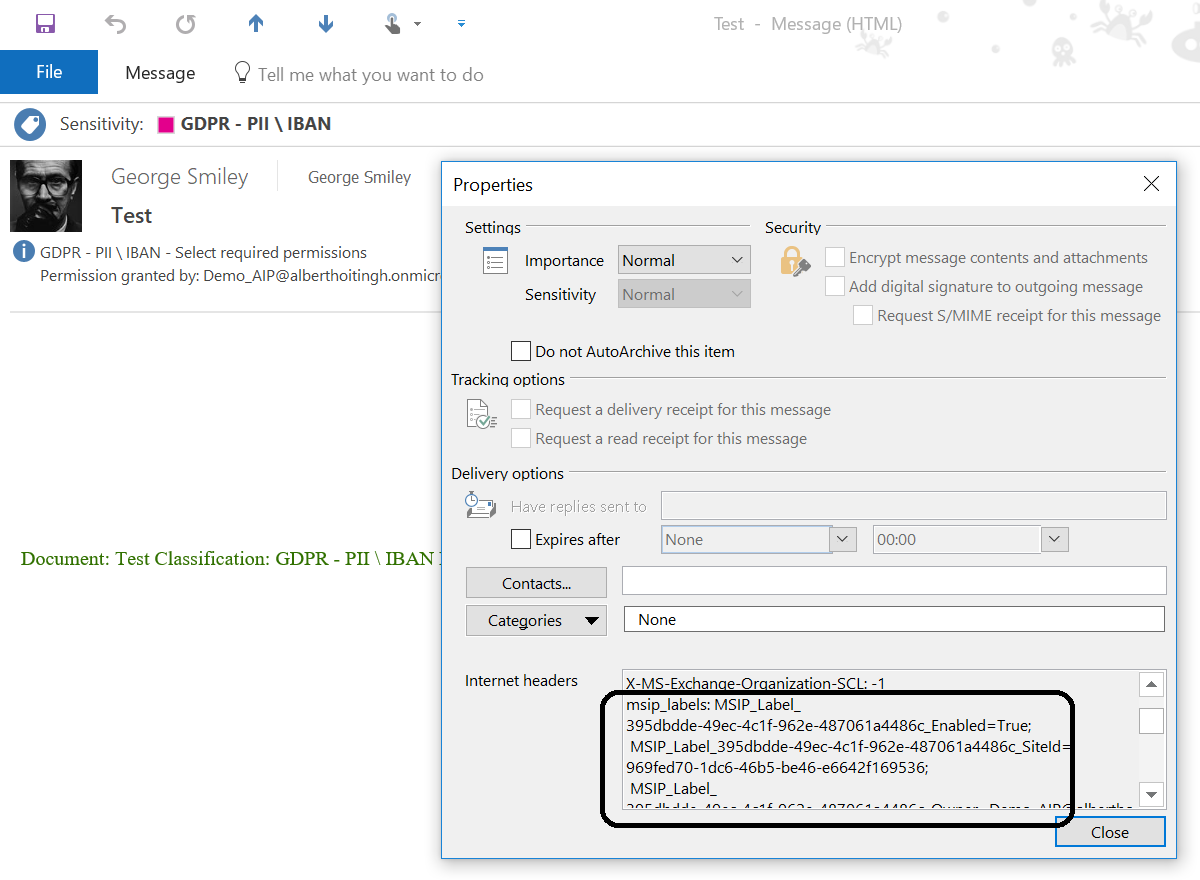
This information is like a wrapper around the content (e-mail message), which allows other platforms (for example DLP solutions) to read the label which has been applied. For example, the header of a labeled e-mail message looks like this.

And we use this e-mail header to block any outgoing e-mails with a specific label. The e-mail example below contains (very abbreviated) the following.
From: George Smiley <user>@<domain>.onmicrosoft.com>
To: Control <user>@<domain>.onmicrosoft.com>
Subject: Test
msip_labels: MSIP_Label_395dbdde-49ec-4c1f-962e-487061a4486c_Enabled=True;
MSIP_Label_395dbdde-49ec-4c1f-962e-487061a4486c_Owner=<user>@<domain>;
MSIP_Label_395dbdde-49ec-4c1f-962e-487061a4486c_SetDate=2018-03-07T;
MSIP_Label_395dbdde-49ec-4c1f-962e-487061a4486c_Application=Microsoft
Azure Information Protection;
You might notice this line:
msip_labels: MSIP_Label_<label-id>_Enabled=True
And this, with the correct label-id, is the one we need.
So how do we get the label-id? Just open the label-blade in the Azure Information Protection portal. And the end you will see the label-id.

Let’s configure an e-mail rule for this. We will block any e-mails going outside of the organisation. And the message header should include the label-id. In this case, the header name should be “msip_labels” (without the quotation marks) and the value should be MSIP_Label_<label-id>_Enabled=True.

This will take care of the scanning of the e-mails and blocking them. You can now configure the other stuff. Like the message you want to present to the users. When saved, the rule will come into effect. Be patient with this, it might take some minutes to become active.
Now, let’s try this out. I try to send an e-mail labeled with “GDPR – PII\IBAN” to an outside contact. And hey-presto: It will be blocked. Don’t mind the Dutch message. Please note the text in the red outline as this is the message I configured.

Concluding
Exchange Online mail rules are very powerful and you can even use them with Office 365 Message Encryption and AzureIP. Want to know more about this? Go to: https://docs.microsoft.com/en-us/information-protection/rms-client/client-admin-guide-customizations
One last remark. Want to go further with Exchange and AzureIP? Then add an AzureIP label (and protection) to an outgoing e-mail by modifying the header. Like this:

Have fun!
Hello Albert,
Thank you for this unique article. I want to implement the scenario you mentioned at the end of the article. The default label in my tenant is “Genel” (aka General). Also, my tenant users need to choose a tag. So it is not possible for an e-mail sent to be untagged.
If a user sends an email outside of the organization, I want the tag to be automatically replaced with the tag “KurumDisi_Label” (aka Outside), regardless of what it is.
Please check this image.
https://prnt.sc/yaq1uq
As a result, although the header of the email changes, the label does not appear to be changed in OWA or Outlook 2016.
I would appreciate it if you could help.
Hi there!
At this moment there is also another way to achieve this. In the mail-rule you don’t have to modify the header anymore. Instead, you can choose the “Apply Office 365 Message Encryption……” rule and as an action choose “Apply Office 365 Message Encryption…..”. You can now simply select the relevant label. Please note that these labels need to have protection enabled.
However – I’ve noticed the same issues as you. If another protection template/label has been applied to an e-mail, the mail rule does not seems to be able to modify this. You can remove the label, but I was not able to apply another one. This is weird behaviour and I cannot solve it at this moment. I tried using a DLP policy and setting a label using this. But alas – emails which have a label cannot be changed.
Sorry about this….
Also, the rule should have the following settings:
Albert, thank you very much for your answer. You enlightened me. I wish you healthy and happy days.