Reading time: 2 minutes

A short and quick guide on how to run the AIP Scanner in the form of “detect-only” mode. An addition for specific sensitive types.
Azure Information Protection Scanner
The AIP Scanner has been around for some time and I do notice an upbeat in the use of the platform. Organizations I speak with want to have a clearer understanding of the data they are planning to migrate to the Microsoft cloud. In addition to more common parameters like the date of last modification or the file type, these organizations are also interested in the sensitivity of the data.
This is where the AIP Scanner comes in, as it allows you to scan your on-premises network shares and SharePoint Server environments. Sidenote: from SharePoint 2013 upwards. Deploying the scanner takes some time, but is documented by Microsoft here: https://learn.microsoft.com/en-us/purview/deploy-scanner. And I’ve also written some articles on this as well.
In the earlier article, I describe how to run the scanner in a “detect-only” mode. But the article did have on drawback: it described how to detect ALL sensitive information based on ALL sensitive information types in the environment. So, in this article, I will go a bit further: how to scan for your specific information types?
What’s the issue?
In some (or most?) cases when you are going to run the scanner, you want to see only the sensitive information your require. But in the earlier article, the results would be any information (documents) and any sensitive information types. And this is cumbersome. But there is an option to scan for specific sensitive information and this is the way I would use this.
Use sensitivity labels
The AIP Scanner was developed to detect, classify and label sensitive documents in on-premises environments. In order to classify and protect documents, you are going to need and use sensitivity labels and auto-classification rules.
When the scanner opens a document, it will detect the sensitivity (as described in the earlier article), classifies the document and applies (or modifies) a sensitivity label. This is the complete workflow. In this article we will focus on the classification bit.
Let’s say you want to detect documents with a Netherlands Burger Service Number (BSN) and documents with credit card numbers. And you want to detect these documents quickly. Using the procedure in the first article, you can filter these documents out of the logs. But try this:
We create a sensitivity label for the BSN and credit card number. These labels are configured to automatically apply or recommend the label based on the corresponding sensitive information types. Both labels are added to a dedicated label policy. This label policy is assigned to the Entra ID account used by the scanner.
The scanner itself needs to be configured as well. And this is done in the content scan-job configuration. Take note that you need to have these settings configured:
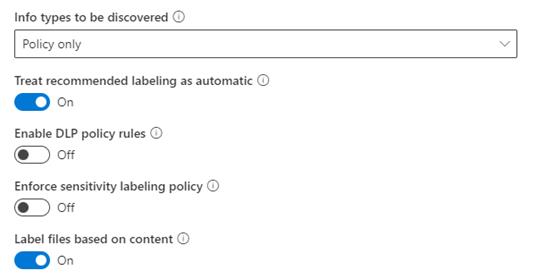
The Policy only indicates that the scanner only looks at the labels in the policy. The recommended labeling as automatic setting makes sure that it does not matter how the auto-classification is enabled in the label.
The DLP setting is not relevant. Because this is related to DLP….. Duh….
Now heads-up! Do not enable the Enforce sensitivity labeling policy if you only want to scan the documents and do not want the labels applied. In the logs it will seems as though the scanner has applied the labels, but this is not the case.
The option to label files based on content is somewhat misleading. This option is required for the scan, as it is needed for the scanner to determine the sensitivity.
In the end
The scanner has two ways to retrieve the results. Either use the CSV-files created on the server itself. Or use the Activity Explorer in the Microsoft Purview portal. Do note however, that this portal will not show you the labels you configured for this scan. The reason is simple: the scanner did not apply them, but only used them to determine the sensitivity.
The CSV-file will be more detailed and will show you which documents where classified based on your labels. And as these labels represent the sensitivity (BSN and credit card), you will quickly see these in the summary document. No need to go through the detailed sheet!!
The summary shows you the following numbers:
- Labeled: Sensitivity was detected, document was classified and labeled
- Protected: Sensitivity was detected, document was encrypted
- Classified: Sensitivity was detected, document was classified
In addition, it will show you the number of documents that were skipped or failed the scans. Also, the number of documents with other sensitive information types, not related to a label, are shown.
In my example, the summary would show:
- Classified as BSN-label: <number>
- Classified as CCN-label: <number>
- Labeled: 0
- Skipped due to – No match: 0
- Etc.
I hope this article helped 🙂
Good information in this one Albert – thanks! Saved me a few hours of lab work to find out how exactly client-side auto-labeling policy application was logged in the scan result CSV file during a discovery-only scan. 💖
Hi
This is really great article.
I am trying to scan On prem repository for credit card data and confused with the required steps.
Hi there,
For the scanner to run in “Detect only” mode, you will need to have (based on my experience) a sensitivity labels set to auto-apply. This auto-apply should work for credit card data. Then add this label to a label policy targetted at the account the scanner uses. Then follow the steps on the scanner side and in the end, you will get an CSV of all documents and if they have a credit card match. You do not need any DLP policies for this.
When changing the labeling policy to include a new label, it seems to take a long time before that label is able to used by the scanner. I can see the label is able to be used in Microsoft applications for local documents on the same machine as the AIP scanner but the label is not being deployed by the scanner. Is this something you have experienced?
Hi there,
Sorry for the late reply – I was off for a couple of days. Yes – I do have the same experiences with the labels being deployed to the scanner. I always install the Purview Information Protection client on the server and see if this client shows me the correct labels when using the scanner account. Also you can download the labels/settings and import these on the scanner – if/when the problem is more network or firewall related.
“Also you can download the labels/settings and import these on the scanner – if/when the problem is more network or firewall related.”
PLEASE, How ?
Do you have a link or something ?
That’s so annoying to wait 24h until you can POC something…
Hi Adrien,
The steps to configure the scanner in offline mode are like this:
1. Go to the Information Protection settings | Information protection scanner
2. Go to the Content scan jobs and export these jobs or the job you need (you’ll get a zipfile containing the .json file or files)
3. On the scanner, you use the Import-AIPScannerConfiguration cmdlet and point to the exported .json files
4. Run the cmdlet set-scannerconfiguration -OnlineConfiguration Off
5. You can now run the scanner in offline mode
See also: https://learn.microsoft.com/en-us/powershell/module/purviewinformationprotection/import-scannerconfiguration?view=azureipps and
https://learn.microsoft.com/en-us/powershell/module/purviewinformationprotection/set-scannerconfiguration?view=azureipps
Should be highlighted that you can’t see the discovered results in the Purview Information Protection portal under Data explorer like you expect you would.
That is, you can’t for example use Data explorer to give a global view of where in your org any credit card data can be found. Shows Microsoft 365 data sources fine, but it won’t show any files discovered by the scanner that were sitting in on-premises file shares.
It’s pretty disappointing, especially since the info’s all there in the .CSV file.