Microsoft Cloud App Security is one of the most comprehensive security solutions. Use it to set AzureIP labels in SharePoint Online.
In the past I’ve written some articles on Azure Information Protection (AzureIP) and Office 365. At this moment I still feel that the integration of the two leaves a bit to be desired. They’re both two very powerful platforms – and would only be better if there’d be a bit more integration.
Well, that’s my view 🙂 anyway.
SPOnline and AzureIP
Regardless of this view, in this article I want to focus on classifying content within SharePoint Online using Azure Information Protection. Because that is certainly possible and brings these two platforms closer together.
Let’s say we have a site-classification scheme developed. And for sites with a classification of “Highly confidential” we want to use Azure Information Protection for classification as-well-as protection. But we don’t want or expect our users to classify all documents by hand. In would be very nice if we could set some form of default AzureIP label.
You cannot set a default AzureIP label within a SharePoint Online library (an option which the data governance labels do provide). AzureIP labels are not available as column (well, using a little work-around they can. But that’s not supported). But there is a platform we can use for this. Microsoft Cloud App Security (MCAS).
Microsoft Cloud App Security
MCAS is one of the most powerful cloud security solutions Microsoft has to offer. The solution provides for cloud discovery (shadow/rogue IT), data protection and threat protection. In this blog I will not explain the ins-and-outs of MCAS. There’s a lot of information already out-there.
But before I go any further, I firstly have to go into the more complex aspects of MCAS…. The licensing 🙂 You can buy MCAS as a stand-alone service or as part of the Microsoft Enterprise Mobility & Security (EMS) suite. In which case, you will need the E5 licenses.
But that’s not all. For Office 365 a subset of MCAS can also be purchased. This is called Office 365 Cloud App Security (OCAS), which offers a limited set of functions. More information on this can be found here. Unfortunately, the Microsoft website also states “Pricing varies by program, region and agreement type. “. So, let’s get this licensing bit behind us and take a look at the labeling functions.
Some remarks
Please note that if you are going to use AzureIP to protect any document:
- any protection travels with the document. So be sure that everyone with access to the SharePoint site can also access the file;
- an AzureIP protected document cannot be previewed or indexed (searched) by SharePoint Online (yet);
- you cannot use Office Web applications (yet) for co-authoring.
And just to be clear: when I’m talking about labels, these are the AzureIP labels and not Office 365 data governance labels. Those two are still separated entities. I’m expecting some more information on consistent labeling to be presented at Ignite. But I digress.
Creating a file policy
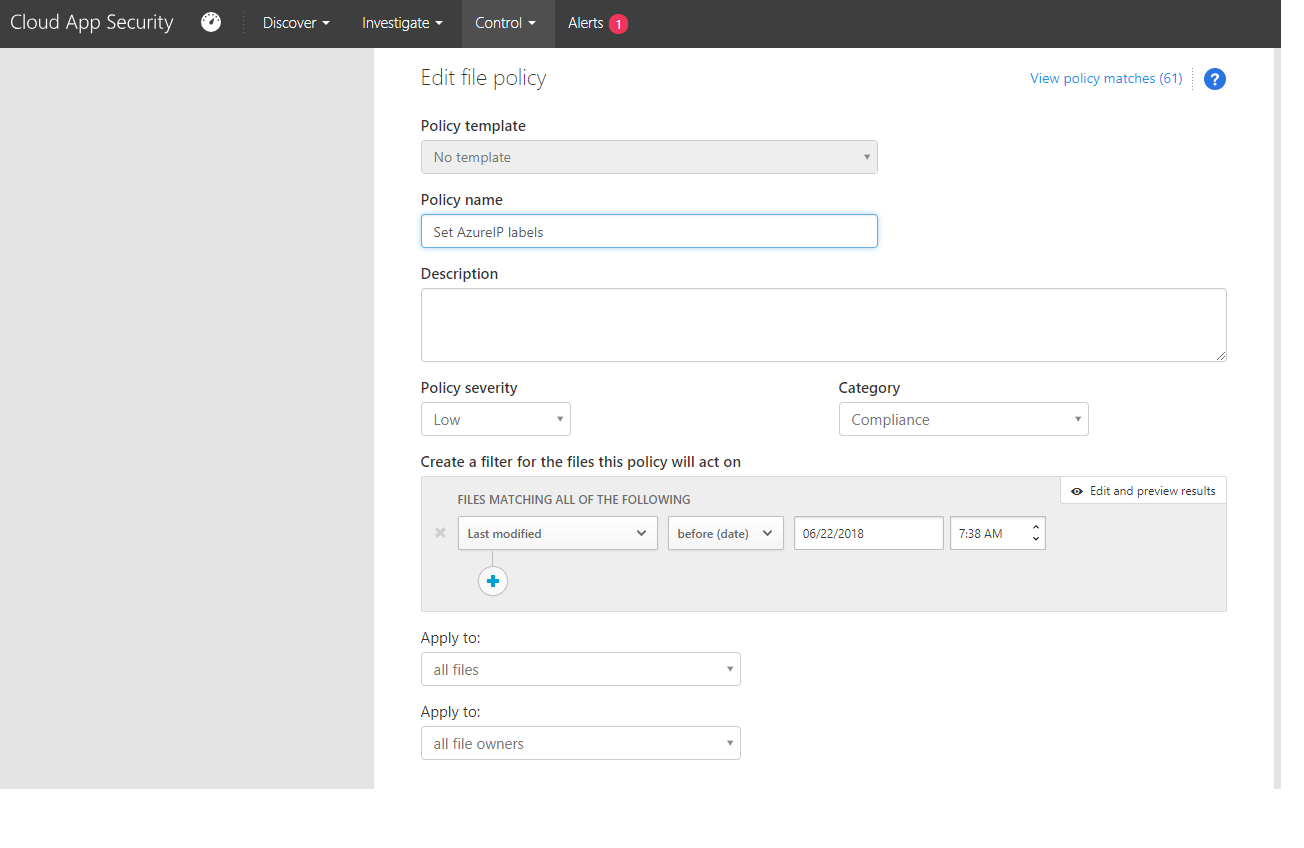
In order to apply an AzureIP label to document, we will need to create a file policy. You go to Control | Policy | Create policy | File policy. As there is no template policy for file-classification, you simply start creating the policy.

There are some details you will need to think about. For example: what kind of documents should this policy be applied to? These are the filter settings. In my example I use the last modification date. Any documents modified before the stated date should be labelled.
I also want to limit the locations. And that can be easily done. At the section Apply to you can select the selected folders options. Here you can select a specific folder, although you can also select complete sites or libraries.

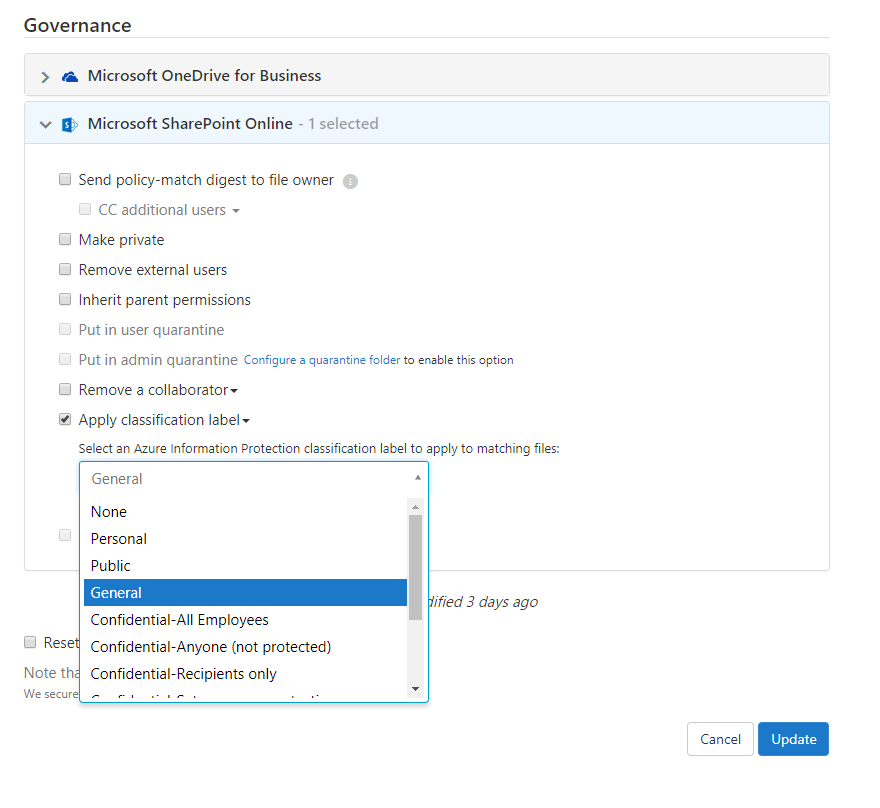
The setting of the label is managed using the Governance section of the policy. Here you will find the Apply classification label option, which will provide you with all AzureIP labels you have configured.

You’re probably also noticing all other options. These are here because the file-policy of MCAS uses an algorithm to search and find all content. When found, these actions can be performed. In other words: you can use these policies as-well for data loss prevention, securing external collaboration and more. Cool stuff!
Quick note: mistakes are easily made and you don’t want all documents in SharePoint Online encrypted (protected) because some administrator selected all locations. Therefore MCAS uses a limit of 100 classifications per day. When this number is reached, the policy is halted and will resume the next day.
Policy active
After configuring the policy, MCAS will start running it. It will discover any information which complies with the policy and will set the label. If a document already has a label, it will not apply the label again (that’s my experience during testing).
To view the status of the policy, simply open it. At the top of the screen, it will show the number of documents which were effected by the policy.

By clicking on this link, you will go to the policy’s detail page. Here’s you’ll find the history of the policy as-well-as the latest results (matching now). You can use any of the filters to search for a specific document.

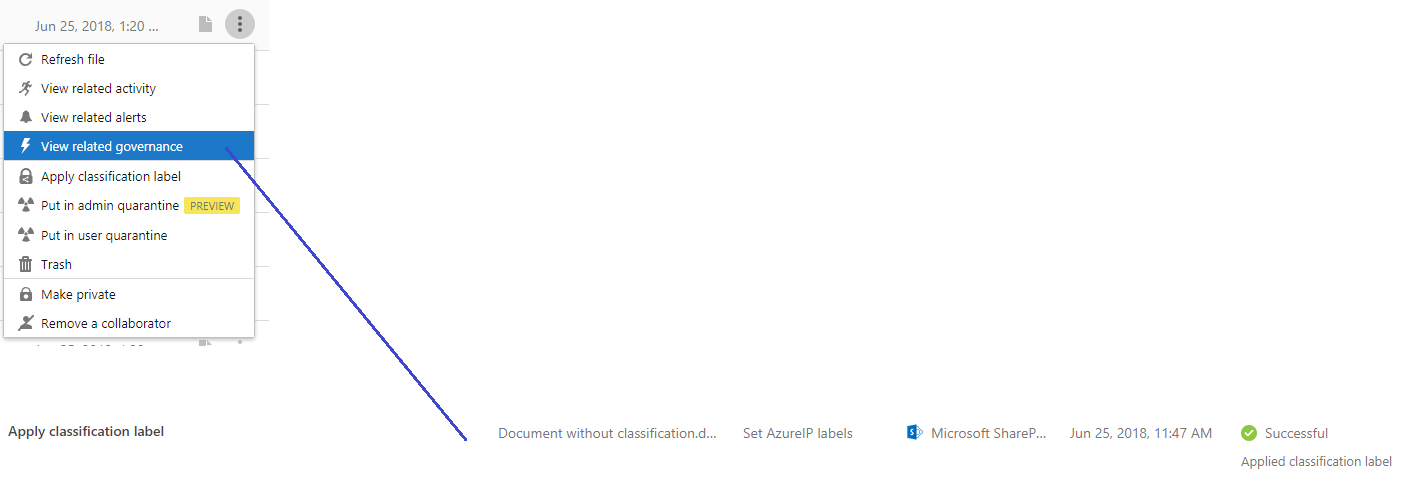
If you want to know what exactly happened to the document, you simply click on the three bullets next to the file and choose View related governance. This will bring up a detailed overview of the actions.

You can also view more information on documents, including the classification, by using one of the other options in MCAS. The Discovery option. By going to Discover | Files | Microsoft SharePoint Online, you will see all files which are currently stored in SharePoint.
By selecting a file, you’ll get a multitude of metadata. Including the classification. If you click on the policy which effected this document, you’ll go to the policy dashboard. Very nice!

Some last thoughts
- If you want to remove a classification label, you can. Simply use the action Remove classification label and run the policy again.
- Normally a policy will check newly arrived content. But if you want to re-run the policy and apply it to all content, you must select the Reset results option.

Like I mentioned in the beginning – I wasn’t planning to go into much depth on MCAS (or OCAS). But I do hope this article provides some information of this very powerful platform. And in the end, did it work?
Well, let’s see. I tested this with a Word document. This document was stored in a SharePoint library. After running the policy to set the label to General I opened the document again. And (no surprise here), it was labeled with the correct AzureIP label. Nice!


Thanks for the detailed explanation. This should be very helpful to anyone that has CAS
https://ajeygupta.blogspot.com/2018/08/difference-between-labels-retention.html
You can read in short about the Labels on the above Blog as well.
Thanks Ajay,
In this blog I try to explain these differences as-well 🙂 as a lot of people still are confused.
You can also read: https://alberthoitingh.com/2018/02/03/having-azure-active-directory-azure-information-protection-and-sharepoint-work-together/