Awareness is key when working with sensitive information. And one method of achieving this awareness is to present a visual marking. When working on a document which has a footer message stating “Sensitive information – do not share”, you might think twice before (indeed) sharing it.
But more serious: you might want to add a visual marking to content which contains Personal Identifiable Information (PII), which is relevant to GDPR.
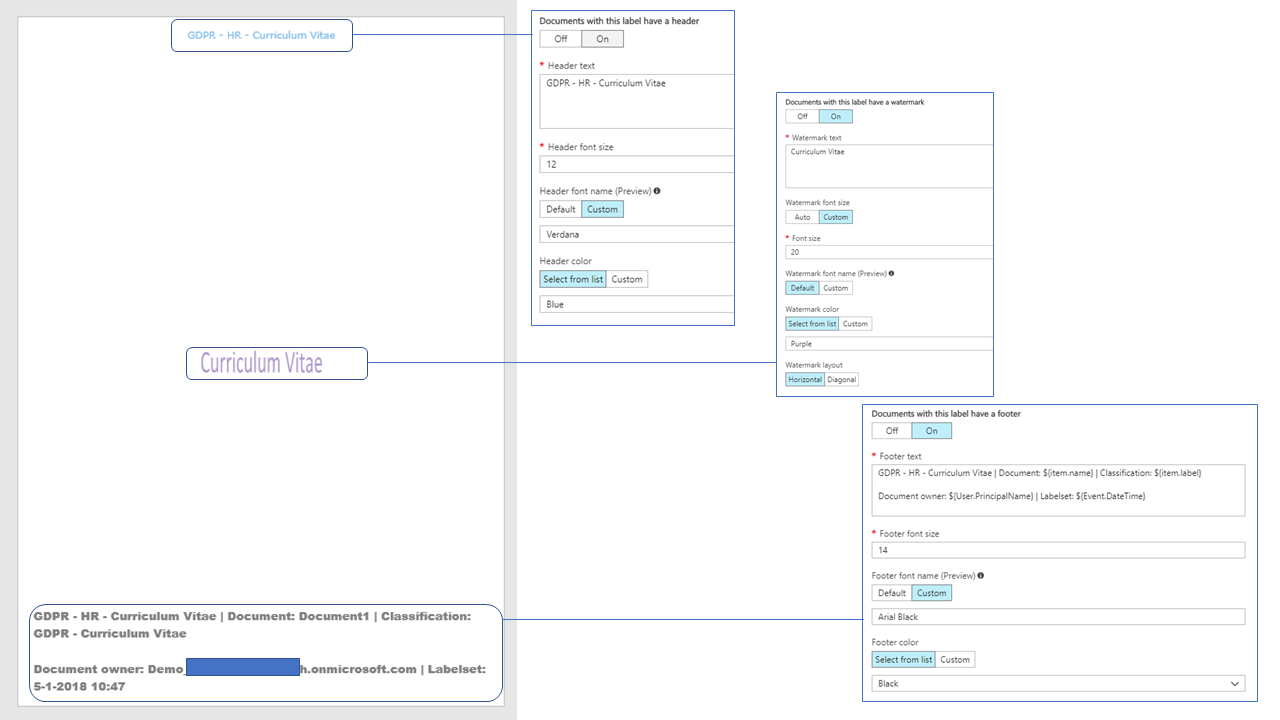
Providing visual markings has always been one of the functions of Azure Information Protection. You can set a header, footer and a watermark. These markings are part of the label policy and can be automatically applied.
Adding label information
What’s relatively unknown is the fact that you can include information on the content and the label policy in these visual markings. You can, for example, add the name of the label to the header of the document.
These are the fields which can be added. I expect that we will see more of these in the months to come.

Appearance
In the most recent versions of Azure Information Protection, you can also change the font, font size and color of the message. If you do not change this font, the system will use its default (Calibri).
Changing the font is still in preview. You will need to add the name of the font. This works very well. The font color can be set using predefined colors or adding your own. Use your ingenuity 🙂
How to set?
Setting these visual markings is easy and the options can be found at the label settings.

Example
Let’s look at an example. At one of my labels, I added some information to the footer and added a specific watermark. The footer was created with these fields:
Document: ${item.name}
Classification: ${item.label}

Document owner: ${User.PrincipalName}
Labelset: ${Event.DateTime}
In addition, I changed the default font (Calibri) to Times New Roman and changed the color. This is a feature which is still in preview.
The watermark had this text (with another font and fontsize).
Do not print - Classification: ${item.label}
When opening a document with the relevant label applied, this footer and watermark was correctly displayed. Very nice.

The footer in more detail:

I’ve included another example at the end of this article.
This option works in Word, PowerPoint and Excel. But do note that that within Excel any visual markings will only be shown when printing (or creating the print preview). You can click on any image to view the large version.


Final thoughts?
This is just on of the ways you can enhance the workings of Azure Information Protection. I did notice however that you can still modify the header and footer. Which is something I did not expect. I cannot find any information on this either…..
I promised another example, and here it is. This is a label which is added to sensitive (GDPR related) content. I played a bit with the fonts and fields.

Hopefully this short article provides you with some more information on the visual markings of Azure Information Protection.
More information on Azure Information Protection and visual markings in particular can be found here: https://docs.microsoft.com/en-us/information-protection/deploy-use/configure-policy-markings
Nice summary of great functionalities.
Do you know if we can “lock” the footers, so that a user cannot remove it?
I had an incident where a user removed the classification fotter, printed the document, and added the footer again.
And claims that when he printed, it was not classified.
None that I’m aware of. But with the new (preview)functions coming like the content explorer, you will be able to see that the classification was removed or changed. This is an a file-level. So you can reproduce the incident. It’s also part of the audit log “Removed sensitivity label from file”. Also, you can have the label policy use the “User must provide a justification….” option. That way, the action is logged and the user is notified of the action. Another way (if your using encryption) is to have the label properties set to exclude the “edit rights” permission or allow only “print” – but this first one will not limit the user in removing the footer and the second one might not be really possible.
hi Albert,
Have you tried using conditions for visual marking? Example below:
${If.App.WXO}This content is confidential. ${If.End}${If.App.PowerPoint}This presentation is confidential. ${If.End}
I was not able to get it working. regards
SS
Hi there SSL,
Yes, I did. Some time ago this did not work with the sensitivity labels. The markings were just presented as plain text. But I just tested this with a couple of labels using: https://docs.microsoft.com/en-us/azure/information-protection/configure-policy-markings/?WT.mc_id=EM-MVP-5003084. This works in my set-up running the 2.7.96.0 unified labeling client.
HOWEVER 🙂 note that this works in the Office Apps. If you try to do this in the Online-versions. you’ll end up with something like this in the header: ${If.App.WXO}This content is confidential. ${If.End}${If.App.PowerPoint}This presentation is confidential. ${If.End}. When opening the document in the Office App, this is “translated” to the correct header and then saved correctly. Yep, something to work on in Redmond 🙂 I made a comment on the docs.microsoft page. Thanks!
Have you tried other variables which don’t include the client?