Reading time: 10 minutes

Two options for mail security and sensitivity labels and also the option to Encrypt my emails. What to use and what are the differences?
Working with Microsoft Purview Information Protection can become somewhat confusing when we apply sensitivity labels to email messages. Especially when Outlook allows us to “Encrypt” our emails. So what to do?
In this blog, I want to focus on:
- The differences between these options;
- The way to remove the “Encrypt” button in Outlook.
TL;DR
This is a medium-length blog article. So here are my pointers:
- Sensitivity labels can be scoped to only emails (for use in Outlook) and can have specific predefined permissions (Reply, Reply All, Forward). But beware that these permissions require the recipient to have a Microsoft account.
- More common email permissions are Do-Not-Forward and Encrypt-only, which always work for the recipient.
- People might get confused if they see both the labels and the option “Encrypt” in Outlook.
So, take these steps into account:
- Create specific labels for email messages. These will only show up in Outlook;
- For generic email protection, use the email permissions for Do not forward or encrypt only, to make sure emails can be opened;
- For specific email scenarios, for example, confidential communication with a partner organization, you can include the domain and email permissions in the label. Make this known and clear to the users (for example: in the label name: Confidential\PartnerX);
- Remove the Encrypt option from Outlook using PowerShell.
Differences
Information protection provided by Microsoft Purview is somewhat complex due to the available options and configuration settings. And securing emails falls under this category. First of all, this post will not mention s/Mime or other email encryption methods. The focus is on Microsoft Purview.
Microsoft Purview has two components for information protection:
- Microsoft Purview Message Encryption (and Advanced Message Encryption)
- Microsoft Purview Information Protection
Microsoft Purview (Advanced) Message Encryption
The first component allows you to set two specific permissions for the email. The “Encrypt only” option does just that. It encrypts the email in transit. The “Do Not Forward” permission configures usage rights to the email. Not only is it impossible to forward the email. You are also not allowed to print the email (including screenshots and during screen sharing) or copy/paste it.
When you add unprotected Office documents as attachments to the email and use the “Do-not-forward” permission, these documents become protected themselves.

Microsoft Purview Message Encryption does not require the recipient of the email to have a specific Microsoft account. Unless the now-protected Office documents are downloaded. But most of the time, the secured email can be opened either in Outlook or by using the secure portal. This is one of the benefits of using these two standard permissions and Microsoft Purview Message Encryption.
Users can select these options from Outlook, using the Encrypt button. More on this later. But we can also configure these permissions in a sensitivity label.


Using these permissions in the label will make sure that Microsoft Purview Message Encryption is used when sending the email. It is a great way to provide this option without users having to search for the Encrypt option.
My advice: add a specific sensitivity label to your hierarchy and scope this only to emails. This way, the label will only show up in Outlook. Give the label a clear name and description. For example Confidential\Encrypted email. And for the permissions, set this to either Do Not Forward or Encrypt Only.
But we do have other permission options and these are contained within Microsoft Purview Information Protection. Now it becomes even more complex.
Microsoft Purview Information Protection
When you apply permissions within a sensitivity label, you can either choose to use the built-in roles or create a custom role. Specifically for emails, you have the permissions to Reply | Reply to All | Forward. Removing this permission will also remove the option in Outlook or the secure portal.

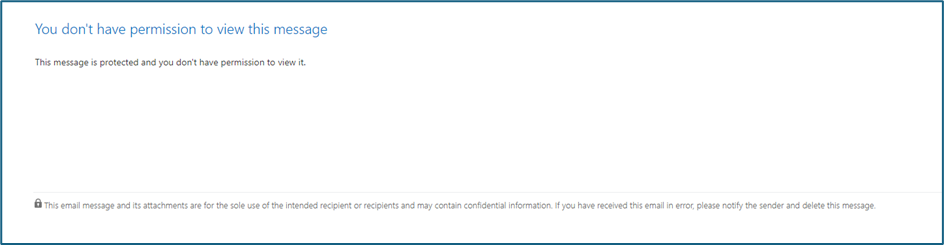
In this example, the email has been opened by an authenticated user, but no email permissions were granted. Perhaps we need to introduce this within our organizations as a default? 😉

The biggest difference between Microsoft Purview Message Encryption and Microsoft Purview Information Protection is the setting of permissions. When we configure a sensitivity label with email permissions, we will need to make sure that the recipient will be able to open the email.
The benefit of this can be to create a secure channel. By configuring specific domains in the label, we can make sure that only users from these domains can open the emails.
The downside is the need to authenticate to open the emails. This can be confusing for the users and is the reason why I advise creating specific (and generic) email sensitivity labels and removing the Encrypt button from Outlook.
I will try to explain this by some scenarios.
Scenario 1: Permissions configured in a label
Let’s say we have a sensitivity label called “Confidential\External”. The label is scoped to Files and Emails. The permissions are configured for specific domains outside of the organization. Because of the scope, it can be selected when creating an email in Outlook. Our users want to communicate securely and label the email before sending it.
However, the recipient is not part of these permissions. The recipient does receive the email but is not able to open this in Outlook or any other client. When opening the email in the secure portal (Purview Message Encryption), an error message is displayed.

The cause for this: the recipient was not part of the permissions and was not able to open the email.
Scenario 2: No email permissions configured in a label
In this scenario, we have a sensitivity label called “Confidential\Documents”. The label is incorrectly scoped to Files and Emails. The permissions are scoped to specific domains outside of the organization and no email permissions are configured. When opening the email in Outlook, the recipient cannot do anything. An unauthorized user is not able to open the email at all.

The cause for this: the label was either incorrectly scoped to Files and Emails or the email permissions should have been added.
Scenario 3: Authenticated users
Like scenario 2: but now the email permissions have been set to Reply. However, it still requires the recipient of the email to have a Microsoft account for opening the email. Without such an account, the same error message would be displayed.

Scenario 4: Attachments
A sensitivity label has been applied to the email. The email has several unprotected Office documents. When the email is sent, the attachments will be protected as well. The user does see a message for this. This message might raise additional questions. Especially the mention of “All other files types…… unprotected” has raised some eyebrows from time to time. But that’s not part of this blog 😊

The recipient can open the email (secure portal or Outlook) and see the attachments. To open the attachments in the relevant Microsoft 365 app, users must sign in to Office with the same account as the mail address. If the recipient does not have such an account, then the document will not open.
My advice
Make sure you scope the labels properly. If you need basic email security, create sensitivity labels that are scope to Mail and use either the Do Not Forward or Encrypt Only option (the latter is the best to start with).
If you are certain that the specific users can use a Microsoft account, then apply the email permissions for Reply, Reply to All, and Forward. For example: for your company “Internal only” label. Or for specific external partners.
Make sure that the labels are part of the correct hierarchy.
What about the Encrypt option?
As mentioned before in this blog, this option is simply available to all users regardless of the use of labels. Simply go to the Options | Encrypt function in Outlook to do so. And these permissions are straightforward and correct. But you can remove these or the entire option.

But what to do when we also have labels? Isn’t this confusing? Yes, I would agree on this and fortunately, we can disable the Encrypt option. When implementing specific labels for email security, you might want to do this.
For this, we need to use the Exchange Online PowerShell module to modify the IRM configuration. Let’s start with this cmdlet: Get-IRMConfiguration. You will see something like this.
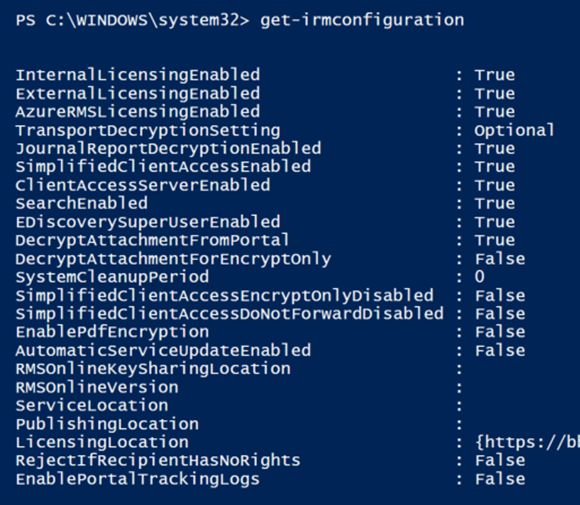
To disable the Encrypt option in Outlook, you need to use:
Set-IRMConfiguration – SimplifiedClientAccessEnabled $false
And if you are wondering what the other variables are. Well, let’s see (when these are set to $true):
- -AutomaticServiceUpdateEnabled: New Azure Information Protection features announced through Microsoft 365 message center will be enabled automatically in your cloud-based organization.
- -AzureRMSLicensingEnabled: Specifies whether the Exchange Online organization can connect directly to Azure Rights Management.
- -DecryptAttachmentForEncryptOnly: The recipients will have unrestricted rights on attachments sent using Encrypt-Only policy.
- -EDiscoverySuperUserEnabled: Members of the Discovery Management role group can access IRM-protected messages in discovery mailboxes.
- -EnablePdfEncryption: Messages that contain PDF attachments can be encrypted.
- -EnablePortalTrackingLogs: Turn on auditing for activities in the OME portal. Activities are visible in the audit logs. Only with Microsoft Purview Advanced Message Encryption.
- -InternalLicensingEnabled: IRM features are enabled for internal messages. This is the default value in Exchange Online.
- -JournalReportDecryptionEnabled: A decrypted copy of the IRM-protected message is attached to the journal report.
- -SearchEnabled: Searching IRM-encrypted messages in Outlook on the web is enabled.
- -SimplifiedClientAccessDoNotForwardDisabled: Do not forward is not available in Outlook on the web.
- -SimplifiedClientAccessEncryptOnlyDisabled: Encrypt only is not available in Outlook on the web.
In the end; I hope this post made some sense and you enjoyed reading it. Setting up a correct labeling hierarchy can be complex. Start small and build upwards quickly. And make sure you know and work with the difference between email and file labeling types.

One comment